
Saniflo Installation
We get it - Saniflo toilets have been engineered to solve common bathroom installation problems, but installation of the upflush system itself can seem kind of confusing, or even intimidating, before you start.
The good news is that nothing could be further from the truth! Saniflo systems are NOT complex to install! In fact, most DIY installations take just a few hours to complete, and they’re typically faster if you hire a plumber to help you. Trust us, you can do this.
In this guide, we’re going to provide a simple step-by-step template for installing your new upflush system. We’ll also hammer out what makes a Saniflo toilet different, how you can choose the right one, and what you need to be mindful of during the installation. We'll also add a few customer photos of a successful installation.
Let’s get started.
How the Saniflo System Works
Before you can install your new system, it’s helpful to have a deep understanding of how it works. While a Saniflo toilet looks and feels a lot like a standard toilet, they have a few important mechanical differences.
While their interiors are hardworking machinery, their exteriors are a fashionable complement to any decor.
The biggest difference is the discharge system. The Saniflo discharge system includes a discharge pipe and macerator. Instead of flushing waste gravitationally (down), it discharges out the back of the unit, through a small diameter pipe (or extension pipe if you are placing the pump behind a wall). When you flush waste, it moves from the bowl to the macerator. The macerator is a powerful tool complete with a sharp, rotating blade.
When the blade begins to turn automatically, it shreds human waste and solids (toilet paper, etc.) into a fine slurry, which it then mixes with flushing water. The slurry moves, with the help of the electric pipe, up the discharge pipes (thus “upflush!”) and into your sewage system, septic tank, or holding tank.
The entire process takes just a few seconds and is quiet and sanitary. In fact – most guests to your home won’t be able to tell the difference between a standard toilet and an upflush system – especially if you purchase an extension pipe that hides the macerator and pump behind a wall.
The only exception is the SaniBEST Pro. This unit is built for commercial use or rental homes where you favor the ability to grind anything. It’s the best available, but sacrifices being quiet to do so. Although it’s not loud, people will notice the unique sound when flushing. If you favor quiet macerating over maximum power, consider the SaniACCESS 3, our top residential unit.
To better understand the system, check out this short, 2-minute video:
Saniflo Installation Made Simple: Your Step-by-Step Guide
Installing a Saniflo system isn’t difficult! Just follow these simple steps to ensure the process of installation is streamlined and smooth:
1. Gather all Your Equipment
You won’t need much to install your new system. Just gather the following things before you begin:
Your Saniflo Upflush Toilet. You should have chosen this model by now. If you haven’t, it’s not hard to find one you love. The SaniACCESS, SaniPLUS, and SaniBEST Pro are our best-selling models and the easiest ones to install. The SaniCOMPACT is also popular as it is smaller, less expensive, and easier to install than every other model we offer. If you’re not sure which model is right for you, we’re happy to help you choose. Just contact our skilled and professional sales associates.
A Water Supply. Your Upflush toilet needs water to flush, so ensure it’s in an area where it has access to a water supply. This water supply could come from a sink, a kitchen on the other side of a wall, or anything similar.
Discharge Pipes. Your discharge pipes can be small – between ¾” and 1”, so you have some room to play with sizes and find one that works for you.
An Electricity Source. Find an electric source complete with a GFI breaker to outfit your new system.
A Venting System. You can vent your Saniflo system anywhere, providing it meets the following requirements: air moves in and out and it adheres to local codes.
Once you’ve gathered these things, it’s time to get your install underway!
2. Pick a Site
You’ve probably already chosen the location where you want your unit to go. Before you start the install, though, ensure you’ve got all your supplies in one place, and that the location is no more than 12 feet below the level of your sewer, or 150 feet from the nearest soil stack. Keep in mind that any fixtures you want to attach to your Saniflo system must also be on the same water level as the toilet. Also, make sure the rubber feet are installed on your unit before it is secured to the floor.
3. Install the Discharge Pipe
Cutting into the material of your soil stack, install a Y-connector to accommodate your macerator’s discharge pipe. Do not use a T-connector because it would introduce fluids into the line too abruptly. A Y-connector flows right into your sewage line. Do this tie in as close as possible to the sewer stack.
If you’re using an extension pipe to connect a concealed macerator to the toilet, make sure you’ve left at least 12” of space behind the framing, and at least a few inches between the pump and the outside wall.
Keep in mind you cannot have the discharge line make any hard 90 degree turns. If you need to make a 90 degree turn you can accomplish this with two 45-degree turns. Your pump comes with an 18” flex line so you can get out of the pump and head straight north without difficulty. We recommend placing a ball-valve at the top of the flex line so you can isolate the pump if need be.
4. Connect Your Water Supply
The next step in your install is to tap into a fresh water supply. This is one of the easiest parts of the entire installation.
You can use any existing water supply to connect your Saniflo system, and can even connect the toilet after the P-trap if you have an existing sink or mudroom system you’d like to utilize. The water supply can also come from a bathroom on the other side of the wall or anything similar.
Just be sure you’re positioning the supply line 10-12” from the floor and using cold, rather than hot, water.
5. Plug the System in
The Saniflo pump is electrically-operated, which means you’ll need access to a 15-AMP circuit to power it. For best results, choose a circuit that’s protected with a Ground Fault Circuit Interrupter, or GFCI.
6. Install the Macerator
Next, you’ll need to install the macerator. Before you do this, make sure you’ve shut off all water and unplugged any sump pumps in the area. Install the included discharge elbow and set the discharge piping. While most Saniflo units can use ¾” piping, it can be as large as 1”. For best results, be sure the discharge piping sits at least 12” off the floor, and runs at a rise rate of ¼” per foot.
Note there is a small hole in the top of some units. Because Saniflo is the global leader of macerating upflush toilets, they manufacture them to work everywhere. This small vent hole is not used in the United States. If you have a unit with a small ventilation hole, you will find a small plastic plug in with your unit. Simply place the plug in the hole. This will keep odors from coming into your living space.
7. Vent the System and Attach the Toilet
The final step in the installation process is to vent the system and attach the toilet. Using a series of PVC connections, connect the macerator pump to your home’s vent system. Remember that you can vent the system anywhere you choose, as long as it has adequate airflow and adheres to your local building codes. It does require a free air vent system (studor and mechanical vents won’t work since they only allow air in, not out). Keep in mind the SaniCompact and SaniStar do not require ventilation.
If you’re not installing any other fixtures on your system, replace the inlet blanking plug and be sure it’s seated properly. Finally, attach the toilet to the pump (or extension pipe) by connecting the toilet to the smaller end of the gasket, and the pump to the larger, flexible side of the gasket. Secure the pump and toilet to the floor (you already installed the rubber feet, right?). Hand-tighten the water supply and – voila! – you’ve got a completed upflush system!
Saniflo Installation Considerations
Want to make your installation process even simpler? Take these things into consideration as you finish the system:
Ensure the Pipes are Freeze-Proof. If you’re installing your system in a place where they may be vulnerable to freezing, be sure they’re covered in external wraps or otherwise protected.
Keep Your Discharge Pipe as Straight as Possible. To help the pump work as well as possible, limit bends and elbows in your discharge pipe. Ideally, any bends should be less than 45 degrees, and the pipe should be as straight as possible.
Support Your Pipes. To help your system last as long as possible, support all your pipes according to manufacturer recommendations. This helps decrease the likelihood of blockages and backups and extends the lifespan of your system.
Whenever you are moving grey water or waste with a pump system (either from adding a sink or shower or simply after you’ve pumped the waste up), it need to have a ¼” drop per foot to allow for gravity to move the waste.
Here are a few additional Considerations for behind the wall (extension pipe) installations:
- Even though you put your pump behind the wall, we recommend you make sure you can still get to it!
- Use insulation between pump and forward wall to further quiet the user experience.
- If you live in a cold area, use insulation between the pump and any outside wall to protect your unit from frost.
- Adding a Washing Machine, Shower, or Bathtub
Many installations allow for additional fixtures or appliances. See our chart below for guidance on which units can handle which additions.
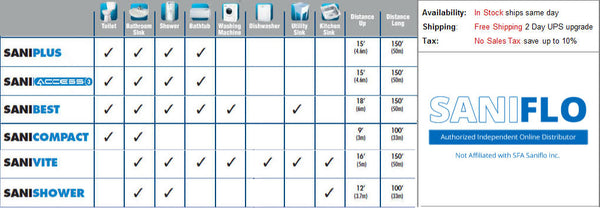
Saniflo Installation Appliances and Fixtures
Grey water pumps like the SaniSwift and SaniVite, as well as the commercial grade toilet systems like the SaniBest Pro and SaniGrind Pro have been designed to accept a washing machine. But please note the washing machine must be drained first into a laundry tub or sink when installing with any of these units.
Adding a shower is simple. The SaniPlus, SaniAccess3, SaniBest, SaniVite, or SaniShower can all handle a shower installation. All of those with the exception of the SaniShower can handle a bathtub. When installing a bathtub, allow for a 2 x 8 inch platform to allow for the installation of a P-Trap and pipe with some drop towards the macerating pump—again we recommend ¼” per linear foot.
You do need to install a P-Trap in vanities, bathtubs, and showers. Even though macerating pumps have built in mechanical traps, most plumbing codes require a regular P-Trap to be installed. You’ll also want it to prevent sewer-type odors.
Frequently Asked Questions Regarding Installation
Do macerating systems, gray water pumps and fixtures need to be vented?
All macerators and gray water pumps have been designed with a vent connection on the lid. All plumbing codes require connection to a vent system. Please note that the vent system should be a two-way air vent. The use of mechanical vents, air admittance valves or similar devices are not permitted as these are considered one-way vent systems. The Sanicompact and Sanistar units are “forced mains” and they do not need to be vented.
How much water does the system use?
All models in the Saniflo line are low consumption.
The SaniPlus, SaniAccess (2 and 3), SaniBest Pro uses 1.28 gallons (4.8 liters) of water per flush.
The SaniStar and the SaniCompact are dual flush systems as they use 1.28 gpf (4.8 lpf) and 1 gpf (3.8 lpf).
This is an added bonus of the installation of Saniflo. It’s significantly more “green” when compared to older-style commodes that may use up to 3.5 gallons (30 liters) of water per flush.
What is the discharge capacity?
It depends on your model and installation. As rules of thumb:
Full systems like he SaniPlus, SaniBest Pro, or SaniAccess3, can pump up to 27 gallons per minute.
The SaniVite can pump up to 18 gallons per minute.
The SaniCompact and SaniStar cannot pump more than 1.28 gallons at a time as it is an electrically timed system.
Is this magic? Where does the waste go?
After discharging through the macerator, the waste is pumped up, then directly to your existing stack. From there, it goes to your sewer system, septic tank, or holding tank. It complies with applicable codes, as long as your current system complies. This is simply an add on to your existing plumbing.
Can I discharge the waste by means of upward slopes?
We recommend the discharge pipe pumps up vertically as high as necessary from the start point, then maintain a ¼” slope per linear foot until it enters your sewage line. This allows gravity to do its part after the pump has done its part.
Can I see some photos so that I can see what this might look like?
Heck yeah! Check out what Dan from Colorado did with these instructions and a new SaniAccess 3:
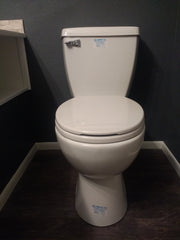
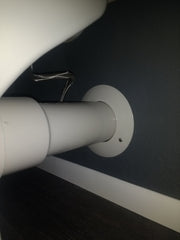
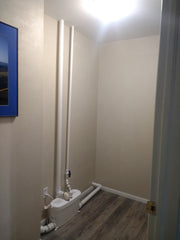
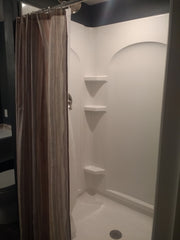
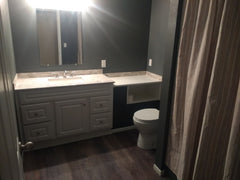
Yay, Dan!
Installation Manuals
All the installation manuals are posted on our website on the product description page. Just look for the "Specifications & Installation Manual" section and click on the link underneath. The manual will open directly in your internet browser.
Need Further Assistance?
If you need additional help with your Saniflo install, be sure to check the details included in your instruction manual or on the individual installation page of the product you purchased—it’s all there.
For more information about our top-selling Saniflo systems, don’t hesitate to contact our team. You’ll always get a Saniflo expert and we’re always happy to help answer any questions. Trust us, you can do this!
